CPUSim64 Programmer Guide
Introduction
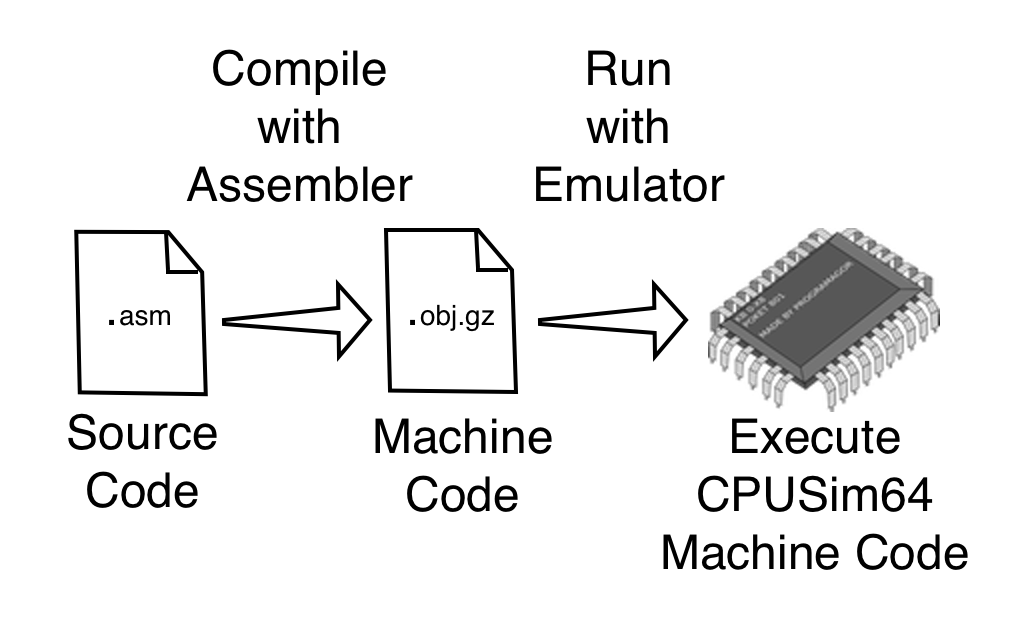
The CPUSim64 project consists of an assembler and an emulator (also called the simulator). The assembler is used to convert assembly language source files into CPUSim64 machine code object files. The emulator is used to execute these object files.
Assembly language files are plain text files that can create with any programming editor. Popular editors include Kate ![]()
 , BBEdit
 ![]() and Notepad++
and Notepad++ ![]() . Microsoft has released an open source code editor called Visual Studio Code that runs on all platforms. There is also the commercial multi-platform Sublime editor. DO NOT use a word processor like LibreOffice Writer, Apple Pages or Microsoft Word as these do not save their files as plain text.
. Microsoft has released an open source code editor called Visual Studio Code that runs on all platforms. There is also the commercial multi-platform Sublime editor. DO NOT use a word processor like LibreOffice Writer, Apple Pages or Microsoft Word as these do not save their files as plain text.
Then you use the assembler to compile your assembly language source files into CPUSim64 machine code object files. These object files can then be run with the CPUSim64 emulator. Both the assembler and the simulator are written in Java so you will need the Java 17 or later VM (virtual machine). You can get Java runtime from Oracle (Commercial) or free OSS versions Adoptium Eclipse Temerin, Amazon Corretto, Azul Zulu as well as others.
Installation
CPUSim64 is composed of Java classes in a jar file located in the "lib" folder of the distribution and script files in the main directory that you can use to run the assembler and emulator in different modes. Download the CPUSim64V2.zip file and expand it to a location of your choice. For this guide we will assume that you expand the ZIP archive in your Documents dirctory.
You are required to install Java JDK 17 on your system and make sure that the Java JDK bin directory is in your system's PATH ejvironment variable. Type the following in your terminal window to see if Java is installed correctly.
If you don't see the Java version printed, check your install and PATH variable. Also it can be handy to put the location of your CPUSim64 directory in the path variable as well. Then you can execute the CPUSim64 scripts from any directory. See How to Set Your Path Variable for detailed instuctions on setting the PATH variable.
Once you have Java and CPUSim64 installed, you can test it out using a the very small program listed below. Use a text editor to enter the text of the program then save it as example001.asm.
Our simple program only has three instructions. The NOP instruction is called a No-Op because it doesn't do anything but take up one CPU cycle. The STOP instruction tells the CPU to stop executing your program and return to the command line. At the very end of all your programs you must place two STOP instructions as this tells the disassembler to stop de-compiling instructions.
Once the program source file is saved you can run the assembler to compile your assembly language program into CPUSim64 machine code. This is done with the compile.sh (or compile.bat for Windows) script. Using the terminal window, navigate to the directory where your source file is saved. Then run the compile script by typing the script filename followed by the name of your source file. Do not include the ".asm" extension as that is assumed by the script. You should see output similar to the output below.
> assemble.sh example001
The program will compile your assembly language source file and create a machine lanugage object file with an ".obj.gz" extension. It will print how many words were compiled from your source when it is complete. If there are errors, they will be displayed.
To run the program use the run.sh (or run.bat for Windows) script name followed by the base name of your program source file. Like the compile script, the run script will first compile your source into an object file. Then the run script will execute your object file on the CPUSim64 emulator. It will print statistics related to your program before it runs such as code size, heap size and maximum stack size. Then your program will run. After it runs, statistics related to the run will be printed such as the number of user CPU cycles used, the wall clock time it took to execute and the return code from your program.
If your program doesn't work as expected you can run it in debug mode using the debug.sh (or debug.bat for Windows) script name followed by the base name of your program source file. Like the run script your program will be compiled and run, but this time the assembler and emulator will be run in debug mode. When running in this debug mode, debug instructions are compiled and executed. Using the trace.sh (or trace.bat for Windows) script is similar to debug but in addition each instruction will be printed as it is executed. In debug or trace mode the entire state of the emulated CPU will be printed when your program ends.
Comments
Because assembly language can be hard to read, it is important to put plenty of documentation in your source code in the form of comments. A comment line starts with two slashes (//) and causes the line to be ignored by the assembler. You can also put comments using double slashes at the end of instruction lines which causes everything from the double slashes to the end of the line to be ignored. It is good practice to put a documentation block at the beginning of the program, functions or other important units of code to explain what the code is supposed to do when it works properly. This can easily be done with a multi-line comment that starts with /* and ends with */. This way someone (perhaps yourself six months from now) can debug errant code because the documentation will tell them what the correct operation should be.
Move Operations
One of the most basic operations available is to move a constant into either an integer register or a floating point register. Integer or floating point registers can be set to an integer with the MOVE instruction. It will take two arguments, the first is the destination register and the second is the constant to move into the register. Constants can be 21-bit Unicode character constants, or integer constants.
Characters constants are formed using a single character in single quotes. It is also possible to use special escape sequences for special characters and Unicode characters whose codepoint is known. The special characters are as follows:
'\0'- NULL Character, codepoint 0
'\b'- Backspace Character, codepoint 8
'\t'- Tab Character, codepoint 9
'\n'- New Line Character, codepoint 10
'\f'- Form Feed Character, codepoint 12
'\r'- Carriage Return Character, codepoint 13
'\"'- Double Quote, codepoint 34
'\''- Single Quote, codepoint 39
'\\'- Backslash, codepoint 92
Given the Unicode codepoint you can also specify a character using the escape sequence of the form \u{xxxx} where 'xxxx' is the 1-6 hexadecimal digit value for the codepoint.
Integer constants can be positive or negative. They can be in decimal format or hexadecimal format. Hexadecimal constants are always preceeded by Ox. Integer constants used in the MOVE instruction must fit into 42-bits (signed), i.e. in the range [-2_199_023_255_552, 2_199_023_255_551] ([-0x20000000000, 0x1ffffffffff])
Floating point registers can be set to an integer constant using the MOVE instruction just as integer registers are. Floating point registers can also be set to a floating point constant using the LOAD instruction. The LOAD instruction will take two arguments, the first is the destination register and the second is the constant to move into the register. Floating point constants can be positive or negative. They are written using floating point notation (a decimal point is required) of up to 16 decimal significant digits. They can also be written using scientific notation such as 1.23e10 or 3.456e-20.
LOAD instruction must be used to load these large integer constants from memory into a register. This is what applies to all floating point constants. They must be stored in the data segment and loaded with a LOAD instruction. When you specify a floating point constant in a LOAD instruction, the assembler automatically puts it into the data segment and substitues the address into the LOAD instruction for you.You can also use the MOVE instruction to move data from one general purpose register to another or from one floating point register to another. You can also use it to move data between general purpose registers and floating point registers.
Debugging
When run using the debug script as in the above example, the entire CPU state is printed when the program completes. That way you can confirm the results of your program. But if you are only interested in viewing a few registers at a time during the execution of your program, you can use the DEBUG instruction to display 1-4 registers at a time.
The assembler and the emulator both accept an optional debugging command line options. The debug.sh script sets the option on both.
When used with the assembler, the special preprocessor symbol __DEBUG__ will be set when the option --DEBUG is supplied on the command line. This allows you to identify code using the assembler's preprocessor that should only be generated for debugging. We will discuss the assembler's preprocessor later.
When you use the --debug option on the simulator, then DEBUG instructions in the code will be executed. If you use the --trace option on the simulator, then each instruction will be disassembled and printed before it is executed allowing you to visually see what your program is doing. In addition any DEBUG instructions in your code will cause debugging output to be printed. If you run your program without the --debug or --trace option on the simulator, debug is off and the DEBUG instructions are treated as NOP instructions.
If you want to display the entire CPU state at some time during the execution of your program in addition to at the end use the instruction INT iPrintCPUState. Unfortunately this uses a system interrupt and is not automatically disabled by the debug settings. You will have to remove it own your own when you no longer need it or conditionally exclude it using the preprocessor. You will also need to include the system definition file <system/system.def> as well for this to work.
Arithmetic
Arithmetic operations are available to perform addition (ADD), subtraction (SUB), multiplication (MULT) and division (DIV) on integer or floating point registers. There are a variety of arguments that can be supplied. There are two forms of two operand operations. The first form takes two register operands, the first operand is the destination and the second is the value to apply to it based on the arithmetic operation and stores the result in the first operand. The second form takes a register operand and an integer literal. Like the first form, it applies the literal second operand to the first and stores the result in the first.
The arithmetic operators also have a three operand form. There are four forms for three operands:
op GP_reg, GP_reg, GP_regop FP_reg, FP_reg, FP_regop GP_reg, GP_reg, int_literalop FP_reg, FP_reg, int_literal
What all these forms have in common is that they apply the operation to the second and third operands and store the result in the first operand. For example:
In addition to the divide operations we have seen so far, there is an additional form that takes four general purpose registers. This version divides the third operand by the fourth then places the integer quotient in the first operand and the remainder in the second.
Finally there are two arithmetic operations that take just a single operand: negation (NEG) and reciprocal (RECIP). The negate operation takes a general purpose or floating point register, negates it then stores it back into the register. The reciprocal operation takes a floating point register, computes its reciprocal (1/x) then stores it back into the register.
Control
We can make control structures such as conditional branching and loops using the JUMP instruction. The JUMP instruction can branch unconditionally or based on the condition of one of the bits in the status register (SR). The status register bit conditions that we can test include:
- zero (
z) - sign (
s) - parity (
p) - overflow (
o)
We can make the equivalent of DO WHILE/WEND and DO/WHILE loops as illustrated below.
When we use a JUMP or CALL instruction we must always supply an address as the last operand (or second to last if an offset is also used). The address can either be a general purpose register with an address in it or an address literal. Address literals can be global or block local. Normally address symbols are global unless they start with an '$' character. Global address labels must be unique within the entire program. Block local addresses are only known inside the function, control structure or block where they are defined and thus can be reused in other blocks. Function names are always global address labels. Programmer defined address labels are symbols followed by a colon (':') that precede an instruction or assembler data directive.
Compare and Test
Two instructions that can be helpful when writing loops are COMPARE and TEST.
COMPARE takes two operands and subtracts them, setting the status register bits according to the computed difference. If the two operands are equal, the Z (zero) status bit will be true. Likewise it will be false (not zero) if they are not equal. When the status register is printed by the DEBUG instruction the zero bit will be a capital Z if it is set (true) and a lowercase z if it is not set (false). This is also the pattern for the other three SR bits, capital is true, lowercase is false. The condition codes we use in the JUMP instruction are z if set and nz if not set, corresponding to "is zero" and "is not zero" respectively. You may also use the condition 'eq' for z or ne for nz.
The TEST instruction simply tests the single operand supplied, setting the status registers based on the attributes of the operand. It is essentially equivalent to comparing the operand to zero.
The table below describes the relational condition codes that can be used with the JUMP or CALL instruction after a MOVE, COMPARE or TEST instruction.
| Condition Code | SR Bit Checked | Relational Equivalent |
|---|---|---|
| u | unconditional | |
| z or eq | Z | op0 == op1 |
| nz or ne | z | op0 != op1 |
| n or lt | S | op0 < op1 |
| p or gt | s and z | op0 > op1 |
| nn or ge | s | op0 >= op1 |
| np or le | S or Z | op0 <= op1 |
Logical Operators
We have a number of bitwise logical operators that can be used for Boolean arithmetic. These operators can also be used for simple logical testing if we restrict our values to -1 and 0. This allows us to represent TRUE as -1 (all bits set) and FALSE as 0 (no bits set). The binary logical operators are AND, OR and XOR. There is one operator that takes a single argument, the COMPLIMENT operator (also known as logical NOT) The following example illustrates this use of the logical operators to print out truth tables.
This last example makes use of console output functions to print the truth tables and format the values. We will talk about console output later in this document.
Named Constants
Using symbolic names for literal values helps with the readability of our programs. It also helps eliminate mistakes caused by repeated typing of the same literal value. With symbolic constants we get the added benefit that if we misspell the symbolic constant, we should get an assembler error. Unlike mistyping a literal value which is often just a different and wrong legal literal value.
One way to create symbolic constants is to use a preprocessor directive #define. The preprocessor directives define simple text substitutions that happen on our code before it is compiled. We have been using one such directive #include to add in code from another file, The #define directive establishes a simple substitution between a symbolic name and a numeric literal (integer or floating point). Whenever the symbolic name is used in our code, the corresponding literal value is substituted just as if we had typed it into the code ourselves. When we use #define we often use all upper case symbols to help remind us where text substitutions are occuring in our code.
The other mechanism for creating named constants is to declare a constant in memory at the end of our code. This is done with the .DCI or .DCF compiler directives to store an integer or floating point value. There are also .DCS directive for storing an UTF-8 encoded Unicode string respectively. In addition, there are the .DCB and the .DCW for defining a list of values. The .DCB is for a list of bytes (packed 8 to a word), whereas the .DCW is for an integer or floating point list (word sized values). In both case the list always has one additional item that is the list size. This will be in the first element at the beginning of the list.
Using named constants we can refactor the truth tables program to be more readable and avoid redundancies thus reducing the chances of typing errors. Symbols for TRUE and FALSE are defined in <system/system.def>. We use a .DCS constant for the formatting strings to printf().
Assembler directives always start with a period '.' to differentiate them from CPUSim64 instructions. Directives are instructions for the assembler to process whereas CPUSim64 instructions are machine instructions for the CPUSim64 emulator.
Disassembly and Symbol Files
You can use the CPUSim64 disassembler to take machine code in a .obj.gz file and turn it back into human readable form. This can be helpful to see exactly how the assembler has interpreted your source code. It can also provide a roadmap for when you run your code in debug mode. The assembler will create three symbol files (.sym,.sym1 and .sym2) that can be used by the disassembler to make your code more readable. You can safely delete these files if you don't need to use the disassembler. You can run the disassembler on your object files using the provided disassemble.sh script.
Arrays
To access elements of an array all you need is the base address of the array and an offset to the element. When you create an array with DCA you should give it a label which will be the base address of the array. Depending on whether the array has integer elements or floating point elements you can use one of the load instruction of the form:
load r0, BASE_ADDR[offset]
load f0, BASE_ADDR[offset]
The offset can be a literal integer or the value in an integer register. Valid offsets are zero through the size of the array. You use the special offset 0 to get the size of the array (n). This essentially makes the array access 1-based where the elements are in positions 1-n.
Console Output
If you include the system header file <system/io.asm> you will gain access to a number of helpful functions for performing output to the console.
| Function | Description |
|---|---|
| puts(str) | Prints a string |
| putc(value) | Prints a character |
| put_int(value, base) | Prints an integer using supplied base |
| put_dec(value) | Prints an integer in base 10 |
| put_hex(value) | Prints an integer in base 16 |
| put_fp(value) | Prints a floating point |
| put_nl() | Prints a new line |
| printf(fmt, values...) | Uses a format string to print variable number of value |
Because these functions pass arguments on the stack, you use the #call directive when you wish to call them. All arguments should be either integer or floating point registers as appropriate to the call. The arguments will then be pushed onto the stack and the function call made.
Interrupts
Interrupts are operating system level functions that are executed via the software interrupt mechanism of the cpu invoked with the INT instruction. Interrupt instructions take a single integer operand to identify the system level function to execute. Interrupts use a register passing convention. If the interrupt requires an input argument, by convention, they are expected in r1/r2/r3 for integer arguments or f1/f2/f3 for floating point. Likewise a value will typically be returned from the interrupt in r0 or f0. Symbols for the various interrupt codes available are defined in the system definition files. You must include the appropriate file to gain access to the definitions. See the Interrupt Reference for a complete listing of operating system interrupts available in CPUSim64.
Command Line Arguments
When writing command line programs it is often necessary to pass in arguments to the program on the command line. There are two system level interrupts that we can invoke. One will give us the count of items on the command line and the other can be used to get each item on the command line. Items on the command line are strings and are separated by spaces. For example:
> run.sh example015 326 Hello 3.1415
The first command line argument in element zero of ARGS is always the name of the program file that is running. For the command line argument interrupts we will need to include <system/system.def>.
Converting Strings to Numbers
Often we will want to take command line arguments (which are strings) and convert them to integers or floating point numbers so that we can do calculations with them. In the <system/string.def> definition file we have some interrupt codes defined to help us with that.
| Function | Description |
|---|---|
| iPARSE_INT | Converts string at address in r1 to integer in r0Accepts both decimal and hexadecimal with the '0x' prefix |
| iPARSE_DEC | Converts decimal string at address in r1 to integer in r0 |
| iPARSE_HEX | Converts hexadecimal string at address in r1 to integer in r0 |
| iPARSE_FLOAT | Converts FP string at address in r1 to floating point in f0 |
If these parsing functions can not make any sense of the string passed in r0, they will cause the program to fail.
Conditional Control
Conditional execution of code is acoomplished using the JUMP instruction. We can compose an IF/THEN construct using one JUMP or an IF/THEN/ELSE construct using two JUMP instructions. For example if we look at the number of command line argumnents passed to the program we can branch based on whether there are any or not. If we compare the result of interrupt iARGC to 2 we will know that there aren't any command line arguments if the result of the comparison is less than. In pseudocode we would have:
Because we want to use a JUMP instruction to branch around the code in the THEN part of the IF, we actually jump on the opposite test. Since greater or equal is the opposite of less than, we shall jump around if argc ≥ 2. See the example code for how this is implemented.
If we want to implement an IF/THEN/ELSE we need two JUMP instructions. Again comparing to the result of interrupt iARGC we can print one message if there are no arguments and a different message if there are arguments. The pseudocode for this is as follows:
If argc < 2 we need to jump around the THEN statements. The THEN statements likewise need to jump around the ELSE statements so the THEN section must end with a JUMP to the end of the IF/THEN/ELSE.
Macros
Often we need to repeat code or similar code multiple times. If the code follows a pattern with just a few elements that differ we can write a macro substitution that can be used to implement the code more easily and correctly.
Macro substitutions are setup with the #def_macro preprocessor directive. Using this directive we specifiy the name of the macro and its parameters in parenthesis. Following that we provide the statements we want to be substituted when the macro is used in our code. In the substitution code we can use the actual values passed when the macro is called by using the special syntax ${varname}. Each time such a special variable symbol is used, it is replaced by the text supplied for that variable when the macro is used.
This next example uses macros with three arguments to compute the minimum and the maximum of two integers inline.
You can make these two macros even more compact (two instructions each) by using a special form of the MOVE instruction that takes a SR just like the JUMP instruction does. If the condition is true, it moves the third operand into the second. If the condition is false, it moves the fourth operand into the second. This is called a conditional move.
We typically use SCREAMING_SNAKE_CASE for macro names to help remind us that a substitution is taking place, just as we do with #define constants.
Register-based Functions
We can better organize our code and make it easier to understand by breaking it up into separate functions that do one thing well. We can then call our functions from many places in our code eliminating the redundancy inherent in using macros.
The basic form of function in assembly language uses register-based calling conventions. This means that the inputs to a function are expected to be in specific registers, typically, r1, r2, etc for integer arguments or addresses and f1, f2, etc. for floating point. By convention, functions are allowed to destroy the contents of r0 and/or f0. In fact these are the two registers in which a function might return a value. But if the function uses any other registers it is expected that it will PUSH the values of the registers it uses onto the stack to save them and restore them with POP when it ends.
Register-based functions are called with the CALL instruction passing the unique label which gives the function its name. The function must use a RETURN statement at the end of its code to return to the calling code.
The calling code sets up the required registers then issues a CALL instruction with the address of the function. The CALL instruction can also take an SR condition like the JUMP instruction does to make the CALL conditional.
Functions can be defined before or after the code that calls them, but functions generally are not to be declared inside other functions.
In the following example we take our minimum and maximum macros and turn them into register-based functions.
Stack-based Functions
Stack-based calling conventions give us some advantges over register calling conventions. First they manage all the PUSH and POP instructions necessary to use registers other then r0 or f0. They also allow us to give symbolic names to arguments and other registers, making our code easier to read.
Stack-based functions are defined using the preprocessor declaration #DEF_FUNC. Stack-based functions are called with the preprocessor declaration #CALL.
At the beginning of your function you can use one #SVAR directive to declare additional named stack variables. You will have to use LOAD and STORE to access these variables. That can be followed by one #VAR directive to declare all your integer or address register named variables. These register variables can be used directly by instructions and can be accessed with the MOVE instruction. That in turn can be followed by one #FVAR to declare all you floating point register named variables.
To return a value simply put it in r0 or f0 then issue the RETURN instruction. You can also use the #RETURN or #FRETURN which takes a register and move it into r0 or f0 respectively, then returns by jumping to the end of the function where there is a RETURN setup automatically for you.
Below is our min/max example using stack-based functions. There is also a sum function for summing a floating point array.
It is important to let your function run to the end and to not issue a RETURN instruction in the middle of the code. This is because the function definition macro inserts stack clean-up code at the end of the function that must be executed before your function returns. Always use the #RETURN or #FRETURN (even at the end for consistency) to make sure stack clean-up is done.
We can even turn our main code into a function and simply call it from the start of our program then exit with a return value returned by main.
Heap Dynamic Memory Allocation
Our programs have access to a whole region of memory called the heap. Our programs can dynamically allocate blocks from the heap as they are running. When we are done with an allocated block we must release or "free" it. In this way we can manage the memory in the heap.
As an example, say we want to allocate enough memory to hold 100 integers. We can do this issue the software interrupt iALLOC with the size of the block we want to allocate in r1. It will return the address of the allocated block in r0 or 0 if there is an error.
For small allocations the iALLOC may allocate a slightly larger block so that there are consistent size blocks in the help which helps when blocks are freed an can be reused. The allocated size is stored in the word right before the address returned by iALLOC. You can access this using a LOAD instruction and a memory reference that uses [-1] as the offset.
String Functions
There are a number of functions for operating on strings. Strings are an array of UTF-8 encoded Unicode codepoints. The string will start with a word that contains the number of UTF-8 bytes in the string. Strings are either statically allocated using a DCS assembler directive and stored in the code segment or they are dynamically allocated in the heap using interrupt iALLOC. It is important to free strings when you don't need them any longer to free up memory in the heap.
Math Functions
Math functions are available for most of the standard math functionality on floating point values. There are also some functions for generating random numbers which is helpful in simulations and games.
Pre-Processor Directives
The pre-processor is a distinct step that runs before your source code is compiled. Its job is not to understand CPUSim64 syntax or semantics, but to perform textual transformations on your source files. The output of the pre-processor is a modified version of your code that is then handed to the compiler proper.
We use the pre-processor to do things like:
- Include other source files: When the pre-processor encounters a directive like #include <math> or #include "myheader.def", it literally copies the contents of that file into the current source file. By the time the compiler sees the code, the include directive is gone and the file’s contents are already in place.
- Expand macros: Macros defined with #define act as text substitutions. Before compilation, every occurrence of the macro name is replaced with its definition. This can be used for constants, small inline expressions, or platform-specific code, though macros must be used carefully because they do not follow CPUSim64's type or scope rules.
- Control conditional compilation: Directives like #if, #ifdef, #ifndef, #elif, and #endif allow you to include or exclude sections of code based on conditions. This is commonly used for:
- Debug vs. release builds
- Feature flags and configuration options
- Provide compile-time shortcuts
- The pre-processor can insert line numbers, file names, or compiler-specific hints using predefined macros such as __LINE__ and __FILE__.
Pre-processor directives are easy to recognize because they always begin with a # and are handled before the compiler performs parsing, type checking, or optimization. As a result, the pre-processor cannot evaluate C++ expressions, call functions, or understand classes—it simply follows the instructions you give it to reshape the source code.
In short, we write pre-processor directives to give instructions to the pre-processor, shaping the raw text of our program so that the compiler receives exactly the code it needs for the current build configuration.
#include
The #include directive inserts the contents of another file into the current source file before compilation.
This is commonly used to pull in shared defines, macro definitions and reusable code.
Includes are processed in-place, so the compiler effectively “sees” one larger combined file. Shared defines and macro definitions are typically put in a file with a ".def" extension whereas reusable code is put in a file with a ".asm" extension.
#include <...>searches system include paths#include "..."searches local project paths
#define
The #define directive defines a substitution symbol: a named piece of text that the pre-processor substitutes wherever it appears.
Defines are expanded before the compiler sees your code. They are powerful but must be used carefully as misuse can produce problems.
Defines are used for constants, small expression substitutions, feature flags and compile-time configuration. Defined symbols can be redefined later in the file using another deefine directive.
By convention we write define symbols in all caps so that it is obvious when they are used that a substitution will occur in the source.
#undef
The #undef directive removes a previously defined symbol, preventing it from expanding further.
This is useful when you need to avoid name collisions or override behavior temporarily.
#def_func
The #def_func directive defines function that uses stack-based arguments.
It is a convenience directive to make defining functions easier.
Functions defined this way can easily be called using the #call directive.
- Helps to break your program into smaller pieces.
- Use it to encapsulate re-usable logic.
- Values are returned in
R0for integer return values andF0for floating point return values.
#call
The #call directive invokes a function that uses stack-based arguments such as ones defined with the #def_func declaration. Arguments must be registers that will have their contents pushed onto the stack. The return value will be in
R0 for integer results and F0 for floating point results. It will clean up the stack after the function call returns.
#def_macro
The #def_macro directive defines a macro containing multiple lines in contrast to the single line of the #define. Macros can also take parameters to implement templated substitution.
This is useful when a macro expands to several lines of output or when you want cleaner syntax for larger expansions. To substitute one of the macro parameters in the replacement text use the syntax ${parm_name}.
By convention we write macro names in all caps so that it is obvious when they are used that a substitution will occur in the source and that the #macro directive is needed to expand them.
#macro
The #macro directive expands (or emits) a macro that was defined previously with #def_macro.
Think of it as “use this macro here,” causing its generated text to be inserted at that point in the output. Arguments can be supplied for the macro expansion to match, one-to-one the parameters defined for the macro.
The preprocessor will expands the #macro directives in the preceeding example producing the following code to send to the assembler.
#global
The #global directive declares or sets a pre-processor global variable.
Global variables persist across the rest of preprocessing, making them useful for configuration, counters, build flags, or values shared across multiple macro/function expansions.
Notice how the #global directive moves the data declaration to the DATA segment of the program so they can be used anywhere without inserting directives in the code segment.
#svar
The #svar directive declares a named stack variables for a function. All stack variables must be declared in one #svar directive and it must occur as the first item inside a function body. Stack variables must be loaded into a register to be used and stored from a register to be changed.
#var
The #var directive declares a named general-purpose register variable for a function. This directive must appear at the beginning of a function block immediately after the #svar directive if present. Register variables are assigned starting with r28 and proceed lower. Be careful not to declare so many register variables that you go past r5 which is where you begin to conflict with registers used for arguments and other temporary values. The registers assigned with #var are saved on the stack and restored by the #return directive.
These variables are commonly used for counters, loop indices, toggles, and computed values used in conditional logic.
#fvar
The #fvar directive declares a named floating point register variable for a function. This directive must appear at the beginning of a function block immediately after the #var directive if present. Register variables are assigned starting with f31 and proceed lower. Be careful not to declare so many register variables that you go past f5 which is where you begin to conflict with registers used for arguments and other temporary values. The registers assigned with #var are saved on the stack and restored by the #return directive.
#return
The #return directive returns a value from a pre-processor function, ending the function. The return value is placed in r0 and all registers setup with #var or #fvar are restored from saved value on the stack. The variables setup with #svar are deallocated. Finally the return instruction is invoked.
#freturn
The #freturn directive returns a value from a pre-processor function, ending the function. The return value is placed in f0 and all registers setup with #var or #fvar are restored from saved value on the stack. The variables setup with #svar are deallocated. Finally the return instruction is invoked.
The preprocessor will expand the previous function example as follows:
#if/#else/#else_if
The #if family provides conditional preprocessing: it includes or excludes blocks of code based on an expression evaluated by the pre-processor.
#ifstarts a conditional block.#else_if(else-if) provides an additional condition if earlier ones were false.#elseprovides a fallback block when no condition matched.
#ifdef/#else
The #ifdef directive tests whether a symbol is defined.
If it is defined, the enclosed block is included; otherwise it is skipped (or the #else block is included). It doesn't matter what the symbol is defined as, just that it is defined. This is frequently used for feature flags and platform switches.
#ifndef/#else
The #ifndef directive tests whether a symbol is not defined.
It is commonly used for include guards (preventing headers from being processed multiple times) and for default configuration.
#for
The #for directive creates a run-time loop, repeating a block of code for a range of values.
Uses a loop variable, condition, start, end and a step value.
#while
The #while directive repeats a block as long as a condition remains true.
Use it when the number of iterations is not a simple numeric range, such as looping until a computed value stabilizes or until a list has been exhausted.
#do_while
The #do_while directive is a loop that always executes its block at least once, then repeats while a condition is true.
This is useful when the loop body computes values needed to decide whether another iteration is required.
#break
The #break directive exits the nearest enclosing pre-processor loop immediately.
Use it to stop generating output early once a condition is met.
#continue
The #continue directive skips the rest of the current loop iteration and proceeds to the next one.
This is helpful when generating output with conditional omissions (for example skipping invalid combinations).
#if_cond/#else_if_cond/#else_cond
The #if_cond directive is a conditional control structure used to represent conditional if/else run-time logic.
#if_cond_sr/#else_cond
The #if_cond_sr directive is a specialized conditional form that branches based on whether a specific status register bit is set or not set.
The #else_cond_sr provides the alternative branch if the status register condition is false. You can use the standard status register pnuemonics (z, nz, n, p, nn, np, o or no) or the relational operators.
#sync
The #sync directive protects a block of code from multi-threaded entry. You must create a mutex and initialize it prior to using the #sync directive.
Namespaces
You can create namespaces using the .block compiler directive. This directive is used to create local blocks for functions and loops but can also be used to create namespaces. For example you can create a namespace called MY_NAMESPACE and declare labeled integers, floats or strings. Then elsewhere in the code you can refer to these labels using the block name, a dollar sign and then the label. This helps avoid global namespace pollution when used to localize label names.
When labels are declared in a block, they must start with a dollar sign to indicate that they are relative to the current block not absolute labels.